• Skip to content
  • Skip to primary sidebar

The Knobbly Plate

A veggie, foodie, photography site

garlic

Delicious Warm, Foraged, Wild Garlic Bread

April 23, 2025 by knobbyplate

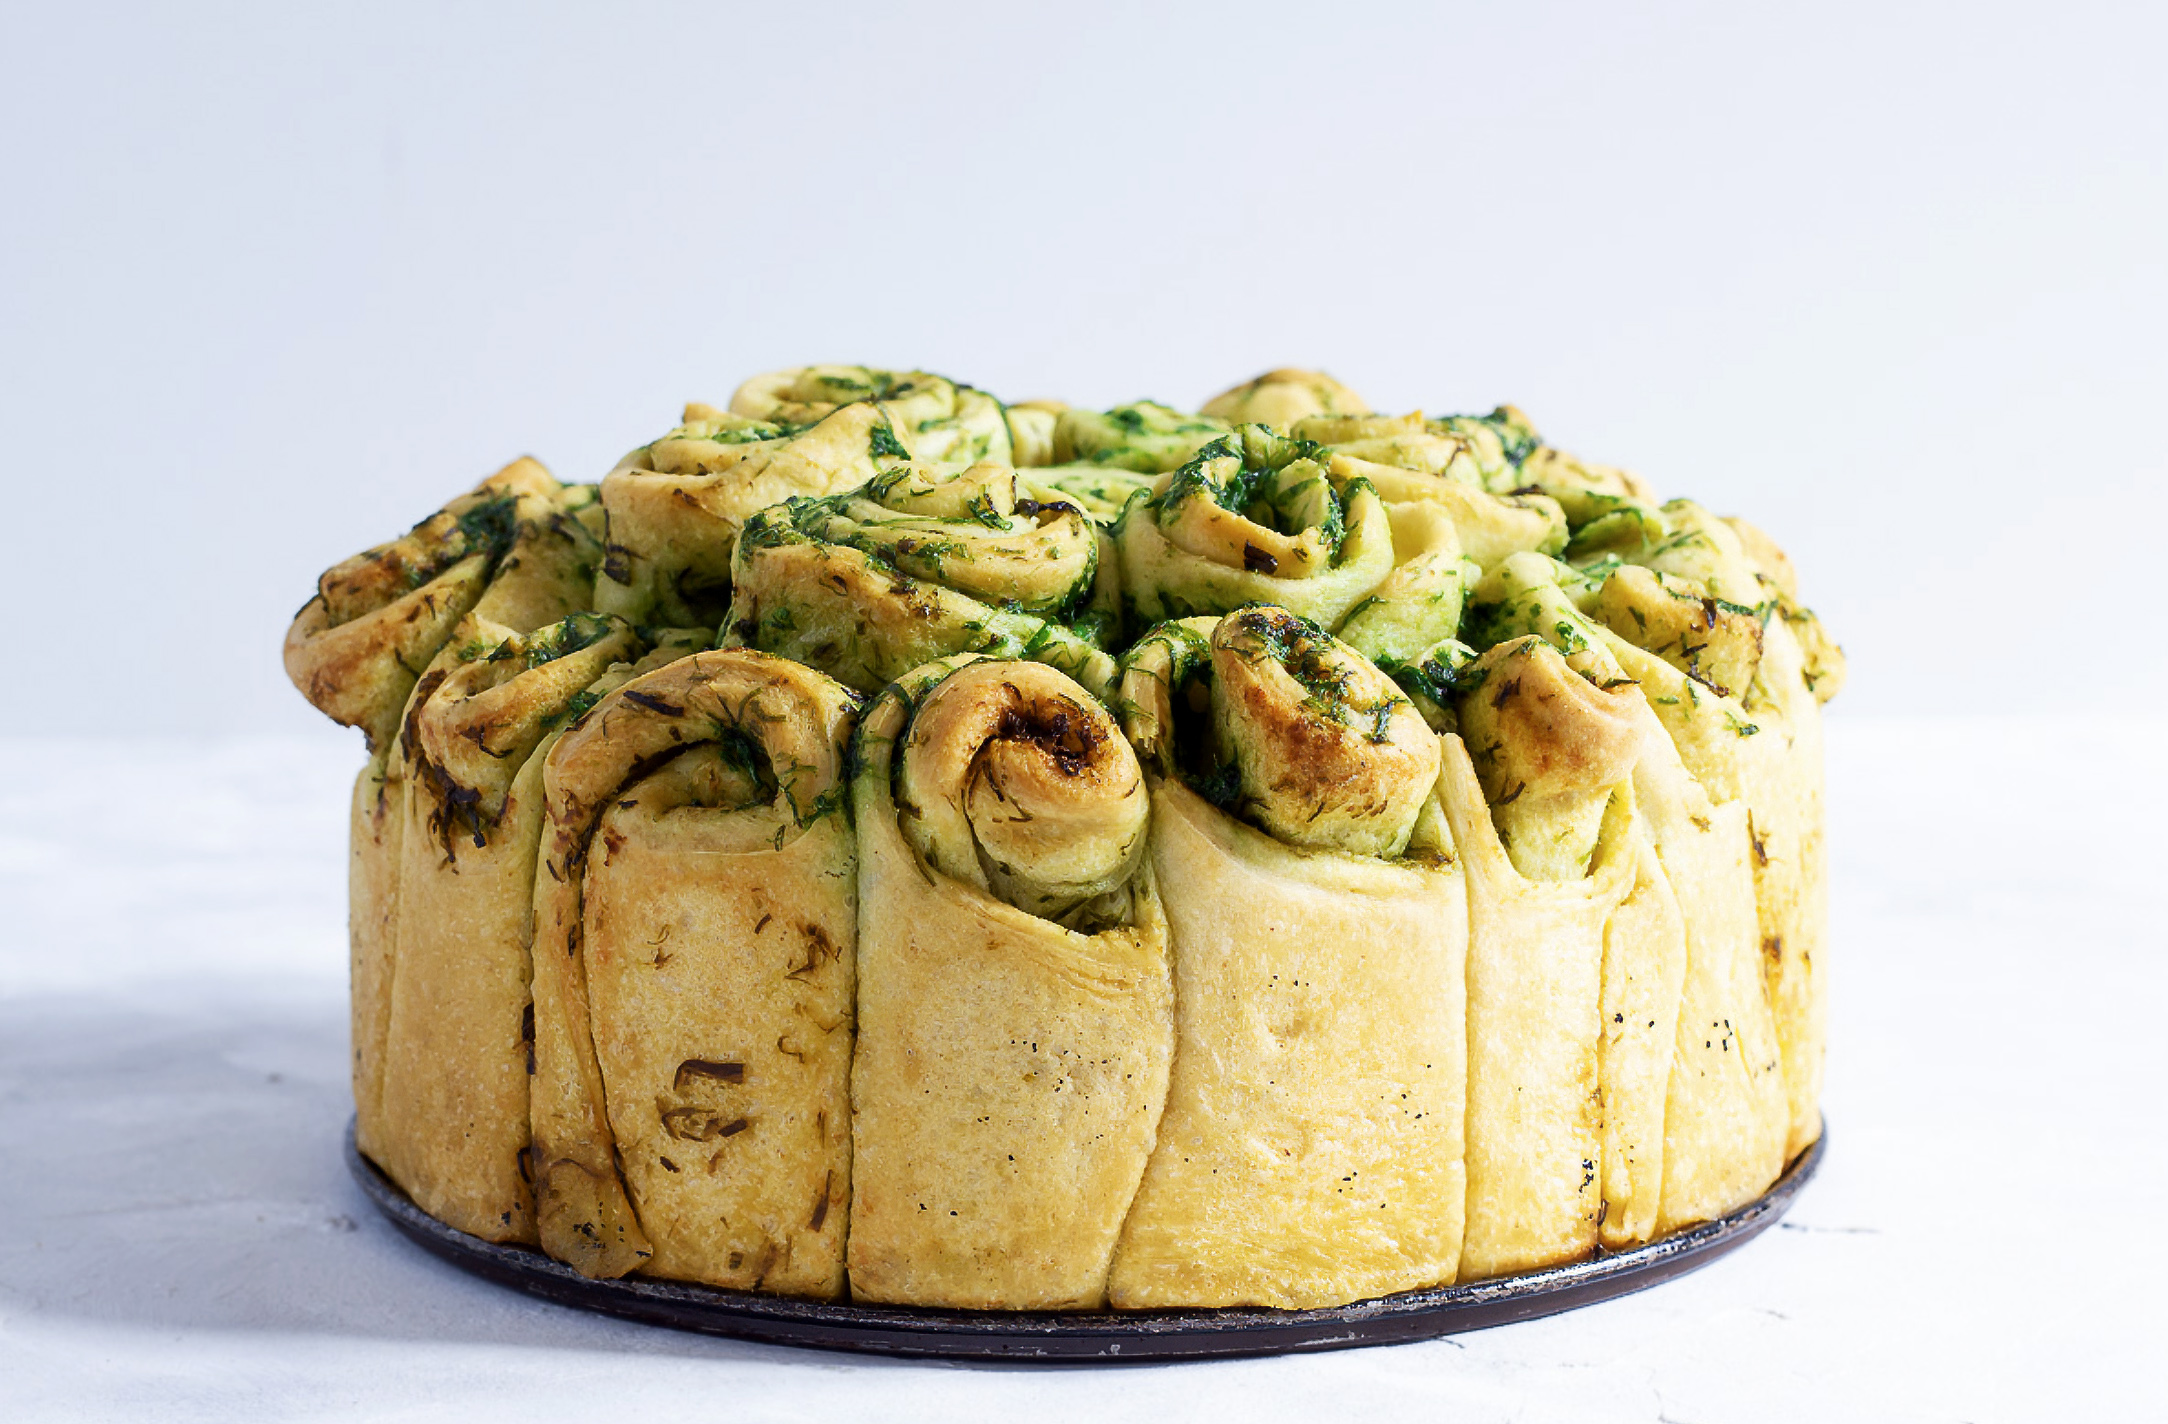
Nestled in the heart of spring, this wild garlic bread is a celebration of the season’s most vibrant offering. Hand-foraged from lush, shaded woodlands, the wild garlic infuses the loaf with its unmistakable aroma — fresh, earthy, and gently pungent — a natural perfume that fills the kitchen as it bakes. The leaves, chopped finely and folded generously into a soft, enriched dough, create vivid green marbling throughout each slice, offering both beauty and bold flavor.

Golden and crisp on the outside, the crust cracks gently under the pressure of your fingers, giving way to a pillowy interior, tender and steaming when torn apart. The scent intensifies as the loaf is broken open, releasing warm notes of garlic, yeast, and a whisper of butter. It’s the kind of bread that begs to be shared — laid in the center of the table, still warm, with pieces pulled off and passed around, fingers brushing, laughter mingling with the sound of crust tearing.

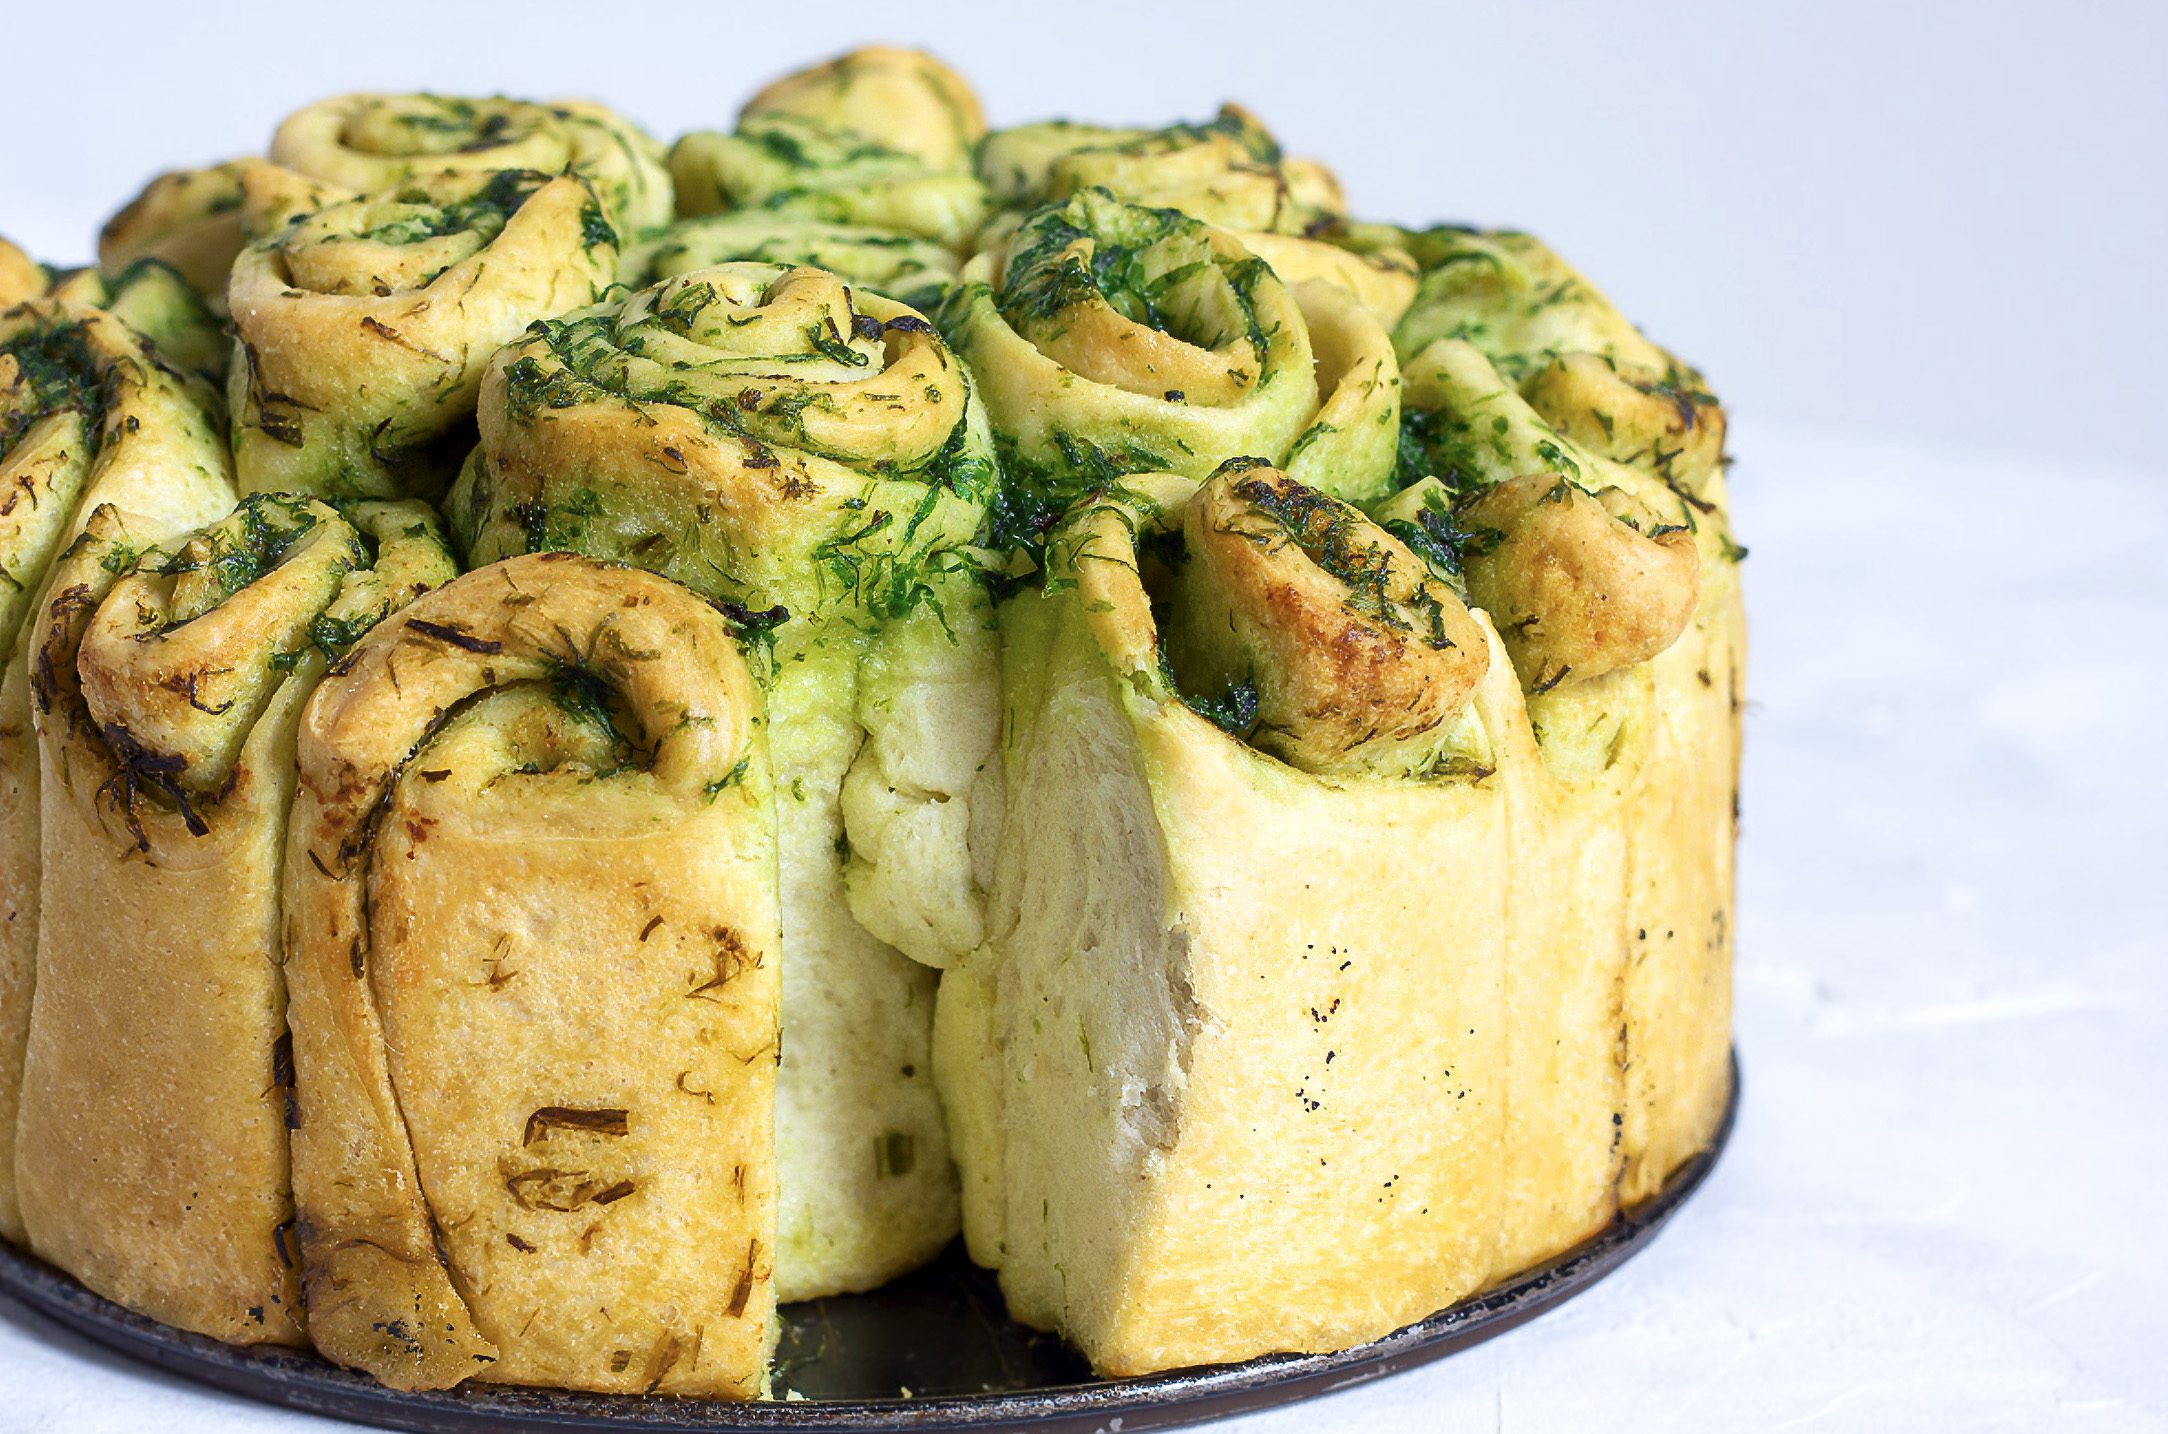
Each bite is a textural delight — the contrast of crunchy crust and airy crumb, punctuated by the mellow, green sharpness of wild garlic. There’s a rustic charm to it, a reminder of barefoot walks through damp meadows and baskets filled with wild greens. Delicious on its own or dipped into olive oil, slathered with salted butter, or paired with soft cheeses, it transforms the simplest meal into something memorable.

This bread isn’t just baked — it’s gathered, kneaded, and loved into life. It’s wild and soulful, a reminder of the bounty just beyond our doors, and of the quiet magic found in the act of sharing food made with our hands and the gifts of nature.

Save Print
Delicious Warm, Foraged, Wild Garlic Bread
Author: Tony Tomlinson
Recipe type: Foraged
Cuisine: British Woodland Food
Prep time:  1 hour 30 mins
Cook time:  45 mins
Total time:  2 hours 15 mins
Serves: 6
 
Ingredients
  • DOUGH
  • * 750 g wheat flour
  • * 400 ml water, lukewarm
  • * 1 tsp sugar
  • * 42 g fresh yeast, corresponds to 1 cube
  • * 2 tsp salt
  • * 5 tbsp olive oil
  • WILD GARLIC BUTTER
  • * 200 g vegan butter, soft
  • * 40 g wild garlic
  • * ¼ tsp salt
Instructions
  1. * For the dough, first mix the lukewarm water (only around 35-40 degrees Celsius) and the sugar. Crumble in the yeast and dissolve by stirring. Let stand in a warm place for about 5-10 minutes to activate the yeast.
  2. * Put the flour and salt in a bowl. Add the yeast mixture and olive oil and knead everything into a smooth dough for a few minutes. Shape the finished dough into a large ball. Cover the bowl with a damp kitchen towel and let the dough rise in a warm place for at least 1 hour. Now also prepare the wild garlic butter or put it out of the refrigerator so that it can become soft.
  3. * Roll out the dough into a long rectangle on a floured work surface and brush with ¾ of the soft wild garlic butter. Halve the rectangle from the short side. Then cut from the long side into strips approx. 5-6 cm thick and roll them up. Don't worry, you don't have to work exact here. Place the dough rolls close together in a greased springform pan (we use one with a diameter of 21 cm). Below you can find pictures of these steps.
  4. * Preheat the oven to 180 degrees Celsius. Since springform pans are usually not completely tight, place a pan underneath in the oven to catch any melting fat. Bake the wild garlic bread for about 40-45 minutes until the crust is lightly brown and crispy. Brush the bread with the rest of the wild garlic butter and bake for another 5 minutes.
  5. * Take out of the oven and let cool down before cutting.
  6. WILD GARLIC BUTTER
  7. * Wash wild garlic and spin dry. Roughly cut into small pieces with a knife.
  8. * Mix the wild garlic, salt and the softened butter (in small pieces) either in a tall, narrow container with a hand blender or in a food processor. Like this it can be used for the recipe.
  9. * If you make more butter and want to keep it: put the vegan wild garlic butter in a clean container or form a roll in cling film. The wild garlic butter can be kept in the fridge for at least 1-2 weeks. But it can also be frozen wonderfully.
3.5.3251


Filed Under: Bread, Foraged, Uncategorized, vegan, Vegetables, vegetarian Tagged With: bread, cheap, foraged, garlic, healthy, wild garlic

A Chinese Inspired Main course of Tender-stem Broccoli with Garlic and Chilli

April 14, 2025 by knobbyplate

A vibrant celebration of spring’s arrival, this Chinese-inspired tender stem broccoli dish is a symphony of colour, texture, and bold, aromatic flavours. The young, delicate florets of tender stem broccoli—bright green and crisply sweet—are the star, embodying the freshness of the new season. Blanched just briefly to preserve their vibrant hue and satisfying crunch, they form a light yet hearty base for this vegetarian main course.

In a hot wok, slivers of fiery red chilli and fragrant ginger are swiftly stir-fried in a whisper of sesame oil. The aroma is immediate and heady, dancing in the air with notes of spice and warmth. The ginger adds a mellow heat, slightly sweet and earthy, while the chilli gives a bold, invigorating kick—perfectly balanced to awaken the palate without overwhelming it. Into this sizzling medley goes the broccoli, soaking up the seasoned oil, transforming as it tosses and glistens under the flame.

A splash of soy sauce adds a depth of umami and a hint of saltiness, while a drizzle of rice vinegar brings brightness that elevates the whole dish. Toasted sesame seeds are scattered over just before serving, adding a nutty crunch and a final layer of texture.

Served steaming hot with a side of jasmine rice or nestled over soft noodles, this dish is at once comforting and invigorating. It is a plateful of spring’s best offerings—fresh, light, and nourishing, yet brimming with personality. The contrast of tender greens and zesty aromatics makes it more than just a vegetarian option; it becomes a seasonal centrepiece. A dish that’s simple in preparation but rich in sensory delight—spring on a plate.

Save Print
A Chinese Inspired Main course of Tender-stem Broccoli with Garlic and Chilli
Author: Tony Tomlinson
Recipe type: Vegetarian/Vegan
Cuisine: Oriental
Prep time:  5 mins
Cook time:  5 mins
Total time:  10 mins
Serves: 4 persons
 
A fresh springtime dish of fresh tender stem broccoli served with garlic and chilli
Ingredients
  • * 400g long-stem broccoli stalks and florets separated
  • * 3 garlic cloves thinly sliced
  • * 4 tbsp olive oil
  • * 1 red chilli deseeded and sliced
Instructions
  1. Bring a large pan of salted water to the boil. Add the stalks and cook for 2 mins, then add the florets and cook for 2 mins more.
  2. Gently heat the garlic and oil together until the garlic just starts to sizzle and brown, then remove from the heat and add the chilli. Drain the broccoli really well and toss in the garlic oil to serve.
3.5.3251


Filed Under: Main Course, oriental, tenderstem brocolli, Uncategorized, vegan, Vegetables, vegetarian Tagged With: brocolli, chilli, garlic, oriental, spring vegetables, stir fry, tenderstem brocolli, vegan, vegetarian

Garlic and rosemary focaccia

February 7, 2024 by knobbyplate

One of my absolute favourite breads to make is Rosemary and Garlic Focaccia. It’s so simple to make using my food mixer as an all in one mixer. Simply add all the ingredients to the mixer and switch it on using my K beater. An absolute favourite of my ex wife it never failed to please and today I make it at least every other week to dip into my winter vegetable soups.

Save Print
Garlic and rosemary focaccia
Author: Tony Tomlinson
 
Ingredients
  • For the dough
  • * 500g/1lb 2oz strong white flour
  • * 7g instant yeast
  • * 1 tsp salt
  • * oil for greasing
  • For the topping
  • * 2 tbsp extra virgin olive oil, plus extra to drizzle after baking
  • * 3 rosemarybranches, needles only, finely chopped
  • * 2 large garliccloves, finely chopped
  • * 1 tsp flaked sea salt
Instructions
  1. Make the dough: Mix the ingredients together, and then knead the dough by hand or with your mixer.
  2. Let the dough rise: Place dough into a greased bowl, cover tightly, then set aside to rise for about 2–3 hours.
  3. Flatten dough out onto a baking pan: Punch down the risen dough to release the air, then use your hands to flatten the dough out onto an oiled baking sheet. If the dough keeps shrinking, cover it for 5 minutes to let the gluten settle.
  4. Let the dough rest in the refrigerator: The cold temperature slows down the rising. In fact, there’s so little yeast that the dough will hardly rise at all during this step. Let it rest in the refrigerator for as little as 1 hour and up to 24 hours. The longer it rests, the better the flavor. I recommend at least 12 hours,.
  5. Remove from the refrigerator: Let the dough hang out on the counter as you preheat the oven and prep the toppings. It will rise a little bit, but not much.
  6. Preheat oven: Focaccia bakes in a very hot 450°F (232°C) oven.
  7. Dimple the dough: A good stress reliever! Use your fingers to dimple the entire surface of the dough.  The dimples give the olive oil and toppings “a place to go.” This step is fun!
  8. Add toppings: A simple blend of fresh garlic, rosemary, thyme, and basil is a favorite, but I have plenty of focaccia topping suggestions listed below. No matter which topping you use, drizzle olive oil all over the surface.
  9. Bake: Bake until golden brown. I set the oven to broil for the last minute to really crisp up the surface. Highly recommended!
3.5.3251


Filed Under: Bread, Uncategorized Tagged With: artisan bread, bread, focaccia, garlic, italian, rosemary

ASPARAGUS, SAMPHIRE, MUSHROOM & ROASTED GARLIC TART

July 20, 2017 by knobbyplate

Yesterday was a good day. I got lots of cooking done from making bread to soup for lunch which I told you about yesterday and last night following inspiration from Malibu Kitchen’s recipe for a similar tart I decided to make a tart from ingredients in the fridge that were starting to get towards the end of their shelf life. There are quite a few ingredients in my tart which could make it a bit on the expensive side if you were to buy all the ingredients fresh. I think the point of this tart is to start with a basic pastry base a few eggs some cream and milk and then look at what you have in the fridge or in your veg basket and design your own tart from there.


I pretty much followed Malibu Kitchen’s recipe because I had most of what she has in her recipe in the fridge. I just had less of it. I did however have the remains of some wonderful samphire that I had bought form Julies Hut, my local crab and fresh fish shack here in Selsey. Can I just say at this point I absolutely love the salty taste of fresh samphire!

I decided I was not going to buy in puff pastry that the recipe originally required but make my own wholemeal pastry. Pastry is not that healthy at the best of times so making it wholemeal at least makes me feel better and I think it has a better taste to it also. I also made my tart slightly smaller so that it meant I would need one less egg and considerably less cream. I have not in the end priced this recipe up as I feel it is irrelevant as like you it is made up of odds and ends that have all been used in previous recipes. I guess though as a rough estimate for a tart that would feed 6 people the basic recipe works out at around £0.82 then you add your fillings.


Save Print
ASPARAGUS, SAMPHIRE, MUSHROOM & ROASTED GARLIC TART
Author: The Knobbly Plate
Recipe type: Tart
Cuisine: British
Prep time:  15 mins
Cook time:  1 hour 40 mins
Total time:  1 hour 55 mins
Serves: 6 Persons
 
Ingredients
  • For the Pastry
  • 150g Wholemeal Flour
  • 150g Plain Flour
  • 125g Butter
  • 1 Egg
  • For the Tart
  • 6 Eggs
  • 100ml Double Cream
  • 50ml Milk
  • 8 Roasted Garlic Cloves
  • 6 Asparagus Spears
  • Handful of Chestnut Mushrooms
  • Handful of Samphire
  • Bunch Snipped Chives
  • 25g Parmesan Cheese
Instructions
  1. To make the pastry
  2. Rub the butter into the mixed flours until you reach that breadcrumb stage.
  3. Add the beaten egg to bind it together.
  4. Place in the fridge for 15 mins then roll out into your tart tin and chill for a further hour.
  5. Place a piece of greaseproof paper in the tart tin and fill with baking beans. Blind bake foe 12 mins at gas mark 5. Take the beans out and bake for a further 5 mins until the base is crisp and golden.
  6. To make the roasted garlic.
  7. Place a whole garlic bulb in a oven proof container.
  8. Drizzle with olive oil and roast in the oven at gas mark 4 for 1 hour.
  9. To assemble the tart
  10. Whisk the eggs with the cream and milk.
  11. Add the cheese and snipped chives.
  12. Burst the cooled garlic cloves and spread over the bottom of the tart.
  13. Add the chopped mushrooms, samphire and asparagus spears.
  14. Pour over the egg mixture and place in a pre heated oven at gas mark 6 for 40 mins until golden and set.
  15. Allow the tart to chill to room temperature before serving.
3.5.3226


Filed Under: Main Course Tagged With: asparagus, garlic, samphire, tart

Rosemary & Garlic Focaccia

July 11, 2017 by knobbyplate

So here we are again! A year after The Knobbly Plate was hacked out of existence we rise from the ashes once again to bring you the very best in vegetarian and vegan cooking for your everyday life at an affordable price.

So what has been going on in the year that we have been away? Well sadly I have split from my wife but there is a silver lining in that. I don’t have to answer to anyone being single so have been able to develop and experiment with recipes to my hearts content. This Focaccia recipe though is an old favorite in this house with everyone who has tried it and has never lasted long enough to go cold being eaten usually within minutes of it coming out of the oven. So I felt that it was a very good recipe to start off the new blog with.


Save Print
Rosemary & Garlic Focaccia
Author: The Knobbly Plate
Recipe type: Bread
Cuisine: Italian
Prep time:  2 hours 15 mins
Cook time:  30 mins
Total time:  2 hours 45 mins
Serves: 6
 
Ingredients
  • 500g Strong White Flour
  • 4 Garlic Cloves Crushed
  • 4 Tablespoons Rosemary Chopped
  • 10g Fast Action Yeast
  • 10g Sea Salt Plus More for Dusting
  • 50ml Extra Virgin Olive Oil
  • 300ml Tepid Water
Instructions
  1. Place all the ingredients in a food mixer with a dough hook and mix until smooth and elastic.
  2. Oil a bowl and transfer the dough to bowl, cover and prove for 1 hour until doubled in size.
  3. Knock back and roll out to around 1 inch and cover and prove until doubled in size again.
  4. Dust with salt and drizzle with extra olive oil.
  5. Bake in an oven at gas mark 9 for 10 minutes
  6. Turn the oven down to gas mark 4 and cook for a further 20 minutes.
3.5.3226


Filed Under: Bread Tagged With: bread, focaccia, garlic, italian, rosemary, salt

Primary Sidebar

About Me

I grew up in Scotland where I learned to forage as a child with my parents for berries on the local moors. I have had a love of all things vegetarian for many many years and this blog will reflect my daily affordable healthy daily diet. As well as being a keen cook I am also a passionate photographer so all the images on this site have been photographed by me. I also intend to use this blog to recommend my favorite cook books to you.

Social Media

  • Instagram

Recipe & Blog Archive

  • May 2025 (1)
  • April 2025 (7)
  • December 2024 (3)
  • October 2024 (1)
  • August 2024 (3)
  • July 2024 (1)
  • May 2024 (2)
  • April 2024 (3)
  • February 2024 (8)
  • January 2024 (4)
  • September 2017 (1)
  • August 2017 (9)
  • July 2017 (13)

Tag Cloud

affordable asparagus baby leaf salad beans beetroot blackberry borough market bread brocolli carrots cauliflower cheap cheese comforting cookbooks cous cous focaccia foraged garlic goats cheese healthy healthy eating italian main course market stall middle eastern mushrooms pasta pesto rosemary salad samphire seasonal seasonal veg spices spinach springtime strawberries summer vegan vegan bowl vegetarian veggie wild mushrooms woodland

Blogpost Dates

May 2025
M T W T F S S
 1234
567891011
12131415161718
19202122232425
262728293031  
« Apr    

Featured Ingredients

ASPARAGUS

Copyright © 2025 · Foodie Pro & The Genesis Framework

Manage Consent
To provide the best experiences, we use technologies like cookies to store and/or access device information. Consenting to these technologies will allow us to process data such as browsing behavior or unique IDs on this site. Not consenting or withdrawing consent, may adversely affect certain features and functions.
Functional Always active
The technical storage or access is strictly necessary for the legitimate purpose of enabling the use of a specific service explicitly requested by the subscriber or user, or for the sole purpose of carrying out the transmission of a communication over an electronic communications network.
Preferences
The technical storage or access is necessary for the legitimate purpose of storing preferences that are not requested by the subscriber or user.
Statistics
The technical storage or access that is used exclusively for statistical purposes. The technical storage or access that is used exclusively for anonymous statistical purposes. Without a subpoena, voluntary compliance on the part of your Internet Service Provider, or additional records from a third party, information stored or retrieved for this purpose alone cannot usually be used to identify you.
Marketing
The technical storage or access is required to create user profiles to send advertising, or to track the user on a website or across several websites for similar marketing purposes.
Manage options Manage services Manage {vendor_count} vendors Read more about these purposes
View preferences
{title} {title} {title}